These instructions are strictly for using Photobucket, a free Internet image hosting service. Other image hosting services are probably very similar in the way they work.
- Capture the screenshot in-game using the camera button (or the "C" key).
- The screenshots will be on your computer under:
- C:\Users\*Your User Name*\Documents\Electronic Arts\The Sims 3\Screenshots in Windows Vista
- C:\Documents and Settings\*Your User Name*\My Documents\Electronic Arts\The Sims 3\Screenshots in Windows XP
- C:\Users\*Your Name*\Documents\Electronic Arts\The Sims 3\Screenshots in Windows 7
- Users > *Your User Name* > Documents > Electronic Arts > The Sims 3 > Screenshots (for Mac OS X)
- Go to http://photobucket.com and create an account if you don't already have one.
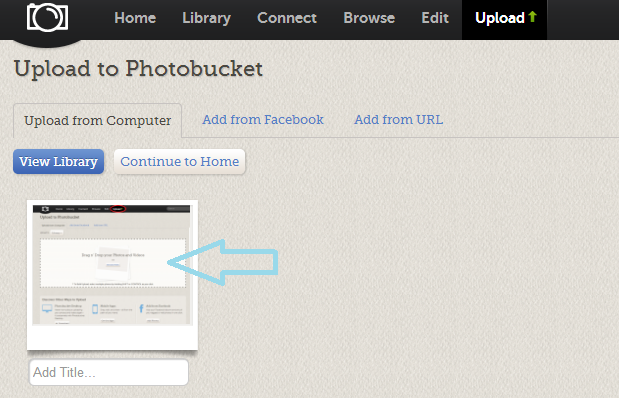
- To upload the screenshot, hit the upload button at the top of the page. Make sure to double check the location the files are being uploaded to. Photobucket always defaults back to your Library instead of the last album used.

- Click on the newly uploaded image when it is done to view it.

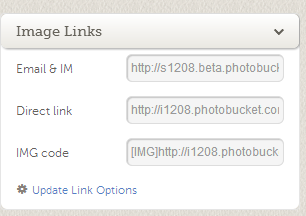
- Click on the box labeled IMG code to automatically copy the photo URL. This code will include everything you need to post a picture on the forums including the image tags.

- Now... go to the forum post and put the cursor where you want your image to show up. Paste the code in that spot. (Control + V)
- Click Preview to make sure everything looks good, then click Post.
- Done!!
Alternative ways to get links (useful for loading multiple images):
- Before you upload, turn on Easy Linking mode by using Photobucket's instructions here.
- Now click on the upload button at the top of the screen to upload your screenshots.
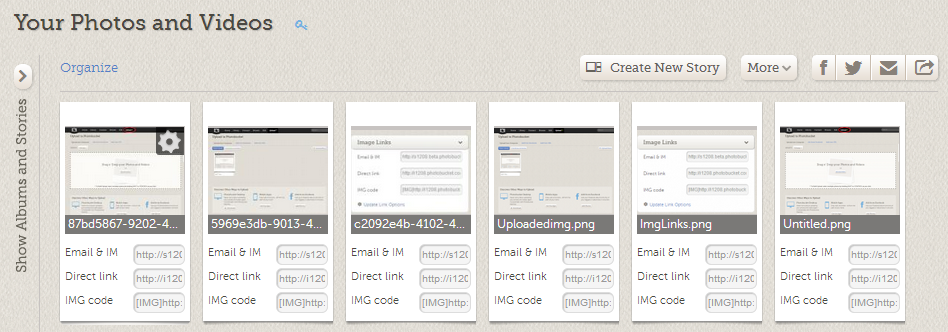
- Once you have uploaded the images - click the "View Library/Album Name* button.
- When viewing your library you should see a list of links under each picture. Click on the box next to IMG code and hit Ctrl+A then copy the link (Ctrl+C).

- Paste the image codes into the forum post where you wanted pictures. Preview for problems and Post when ready.
Due to the recent upgrade to photobucket, at the time of this writing, the ability to auto copy with a single click is not available for easy links. They've said that it is a work in progress and hopefully will be available in the future.
Resizing your photos using Photobucket
There are hree ways to resize your photos with Photobucket. One way is to set it up so every photo uploaded is made into the same size. The second way is so that you change it per upload session. The last way is to manually change just the ones you want changed.
- First Way: Go into your User Settings by clicking on your name at the top and selecting it from the drop down menu.
- Choose the Albums tab under settings.
- Click on the link under "Upload Options".
- Choose the 800 x 600 for forum standard. Now all uploaded pictures will be auto resized to 800 x 600.
- Second Way: Go to the upload page right before you upload pictures to use.
- Choose the 800 x 600 option for forum pictures.
- Upload like you always do. Then when you go to upload something for home, school or eBay - you can change it back to another setting that suits you best.

- Third Way: Click on the photo you wish to resize from your Library/Album page.
- Choose the Edit button above the photo.

- Choose the resize button at the top above your picture.

- Forum standard size is 800 x 600 so that's what all of your pictures should be when posted. If using these exact dimensions warps the picture, just try to get the width of 800 and let the editing tool choose the correct height.
- Make any other edits you need to make and then hit the save button. This will automatically return you back to the image's page where the links are available to right.
- Follow the instructions further above for posting the image into a forum post.
As always, let us know if you have questions or problems!
Updated March 21, 2013 by Ricalynn